
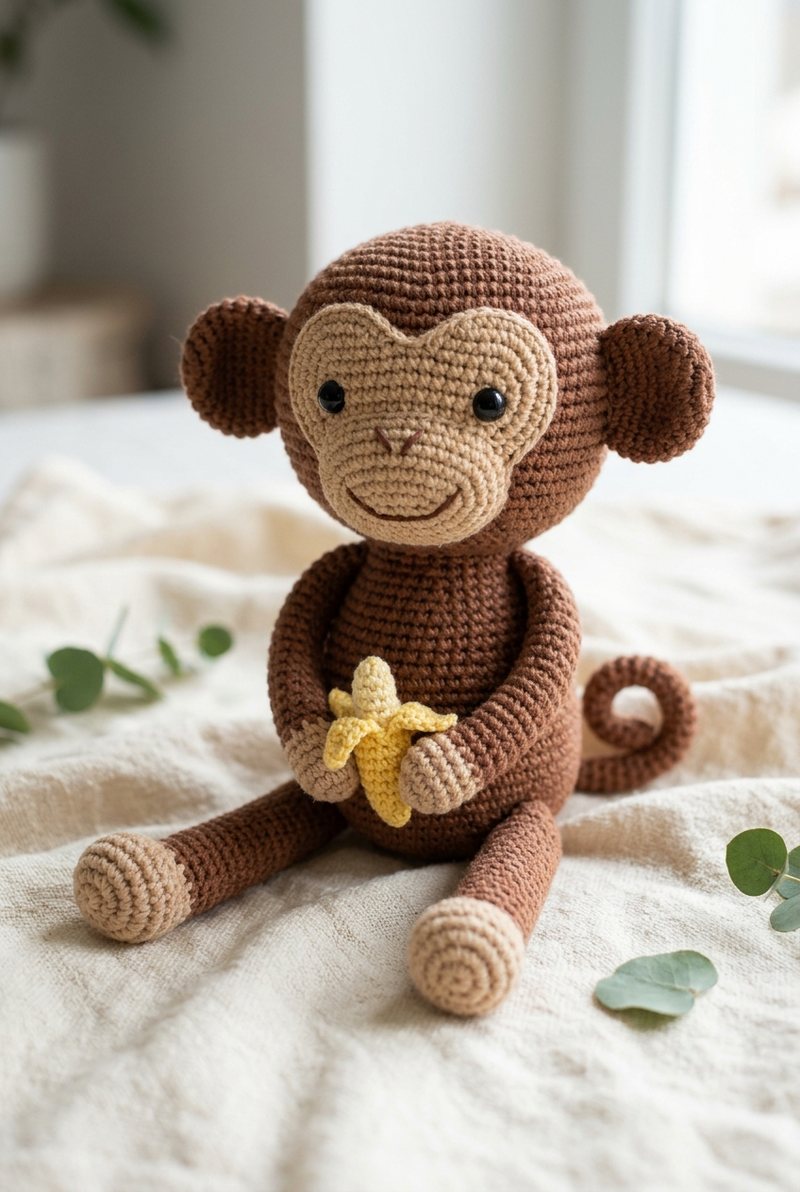
Momo is a cuddly, round brown monkey with a tan heart-shaped face patch, round ears, long arms and legs, and a curly tail. He sits holding a little yellow banana.
Crochet each piece in spiral rounds with sport cotton and a 2.5 mm hook, then sew the parts together. The photos show each stage, and the variation gives Momo a grey coat.
Looking for another animal? See all our crochet animal patterns in one place, sorted by farm, wild, ocean, pets and fantasy.
Momo the Monkey Free Crochet Pattern
What You’ll Need
- Sport / fine (size 2) cotton yarn: sport-weight cotton in brown, tan and yellow, plus a little black for embroidered features
- 2.5 mm crochet hook (a hook smaller than the yarn label suggests keeps the stitches tight)
- 8 to 10 mm safety eyes (or black yarn to embroider them)
- Fiberfill stuffing
- Tapestry needle, sewing pins and a stitch marker
The finished size depends on your yarn and hook: thicker yarn and a bigger hook make a bigger piece.
Abbreviations (US terms)
- MR magic ring
- sc single crochet
- inc increase: 2 sc in the same stitch
- dec decrease (an invisible decrease gives the smoothest finish)
- ch chain
- sl st slip stitch
- R round; Row row worked flat; the number in brackets is the stitch count at the end
Body, Arms, Legs and Tail
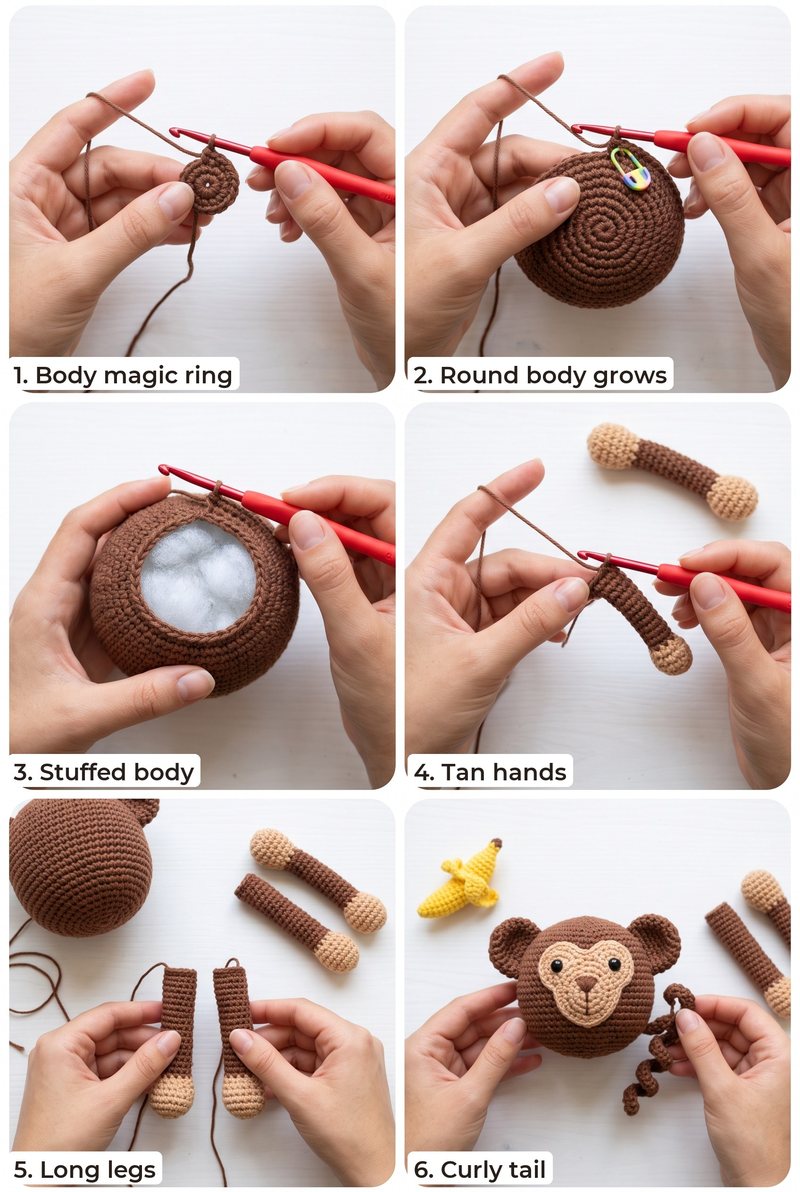
Make the rounded body first, then crochet the long limbs and curly tail. Leave the limbs lightly stuffed so Momo can sit comfortably.
Body (brown, make 1)
- R1: 6 sc in a magic ring (6)
- R2: inc ×6 (12)
- R3: (1 sc, inc) ×6 (18)
- R4: (2 sc, inc) ×6 (24)
- R5: (3 sc, inc) ×6 (30)
- R6: (4 sc, inc) ×6 (36)
- R7-9: sc around (36)
- R10: (4 sc, dec) ×6 (30)
- R11: (3 sc, dec) ×6 (24)
- R12: (2 sc, dec) ×6 (18)
- R13: sc around (18)
- R14: (1 sc, dec) ×6 (12)
- Stuff the body firmly, shaping it into a round, seated form.
- R15: dec ×6 (6)
- Fasten off and close the opening.
Arms (tan, then brown, make 2)
- R1: 6 sc in a magic ring (6)
- R2: inc ×6 (12)
- R3: (1 sc, inc) ×6 (18)
- R4-5: sc around (18)
- R6: (1 sc, dec) ×6 (12)
- Change to brown.
- R7-14: sc around (12)
- Stuff the tan hand lightly and leave the brown arm unstuffed or lightly stuffed.
- Close: 6 sc through both layers (6)
- Fasten off, leaving a tail to sew the arm to the upper sides of the body.
Legs (tan, then brown, make 2)
- R1: 6 sc in a magic ring (6)
- R2: inc ×6 (12)
- R3: (1 sc, inc) ×6 (18)
- R4-5: sc around (18)
- R6: (1 sc, dec) ×6 (12)
- Change to brown.
- R7-16: sc around (12)
- Stuff the tan foot lightly and leave the brown leg unstuffed or lightly stuffed.
- Close: 6 sc through both layers (6)
- Fasten off, leaving a tail to sew the legs low on the front of the body, pointing forward for a seated pose.
Tail (brown, make 1)
- Ch 25. Row 1: 3 sc in the 2nd ch from the hook and in each ch across (72)
- Fasten off, leaving a tail for sewing. Sew the straight end to the lower back of the body.
Head, Face and Ears
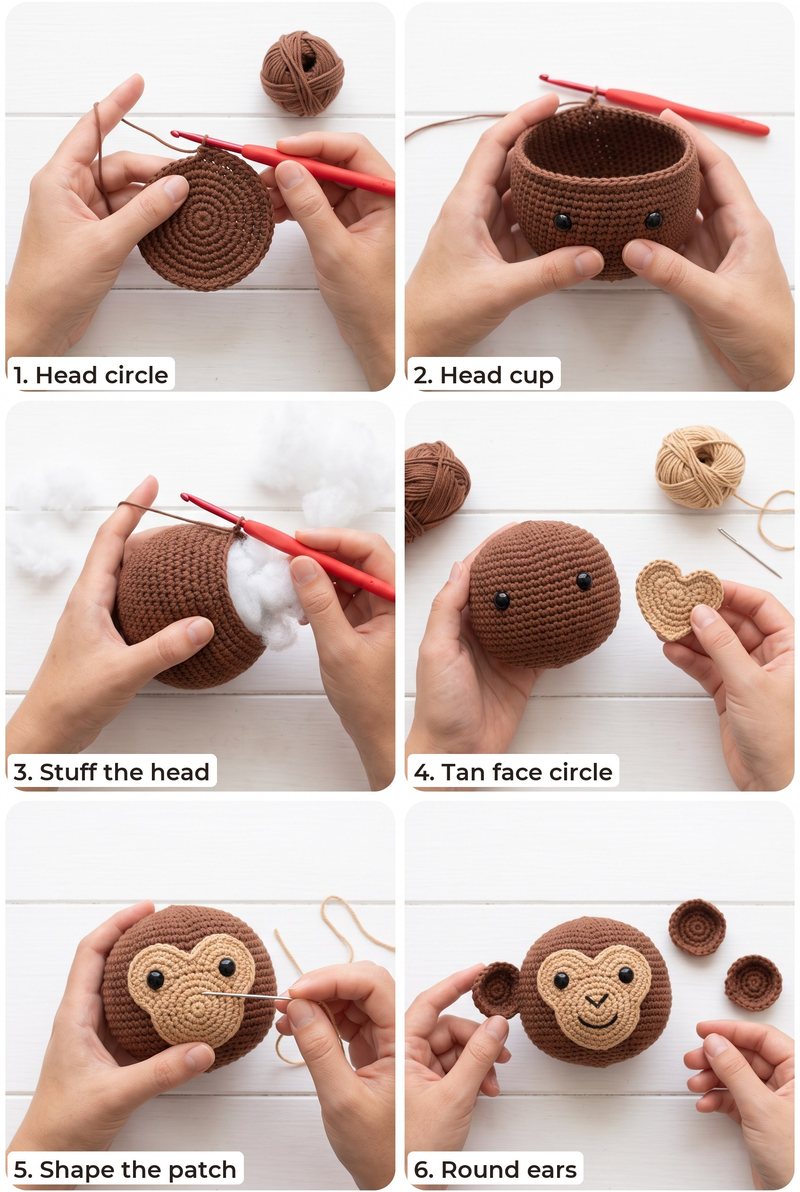
The tan face begins as a flat circle. Shape its upper edge as you sew to give Momo a heart-shaped patch.
Head (brown, make 1)
- R1: 6 sc in a magic ring (6)
- R2: inc ×6 (12)
- R3: (1 sc, inc) ×6 (18)
- R4: (2 sc, inc) ×6 (24)
- R5: (3 sc, inc) ×6 (30)
- R6: (4 sc, inc) ×6 (36)
- R7: (5 sc, inc) ×6 (42)
- R8: (6 sc, inc) ×6 (48)
- R9-13: sc around (48)
- Place two 8 mm safety eyes low on the front of the head, leaving space below for the face patch. For a baby, embroider the eyes instead.
- R14: (6 sc, dec) ×6 (42)
- R15: (5 sc, dec) ×6 (36)
- R16: (4 sc, dec) ×6 (30)
- R17: (3 sc, dec) ×6 (24)
- Stuff the head firmly and keep stuffing as you close.
- R18: (2 sc, dec) ×6 (18)
- R19: (1 sc, dec) ×6 (12)
- R20: dec ×6 (6)
- Fasten off and pull the opening closed. Embroider a small smile in black.
Face patch (tan, make 1)
- R1: 6 sc in a magic ring (6)
- R2: inc ×6 (12)
- R3: (1 sc, inc) ×6 (18)
- R4: (2 sc, inc) ×6 (24)
- Fasten off, leaving a long sewing tail. Pinch the upper edge slightly at the center as you sew it to the lower front of the head to suggest a heart shape; embroider a heart outline if desired.
Ears (brown, make 2)
- R1: 6 sc in a magic ring (6)
- R2: inc ×6 (12)
- R3: (1 sc, inc) ×6 (18)
- R4-5: sc around (18)
- R6: (1 sc, dec) ×6 (12)
- Do not close the small cup. Flatten its opening and fasten off, leaving a tail to sew each ear to the sides of the head.
Banana and Assembly
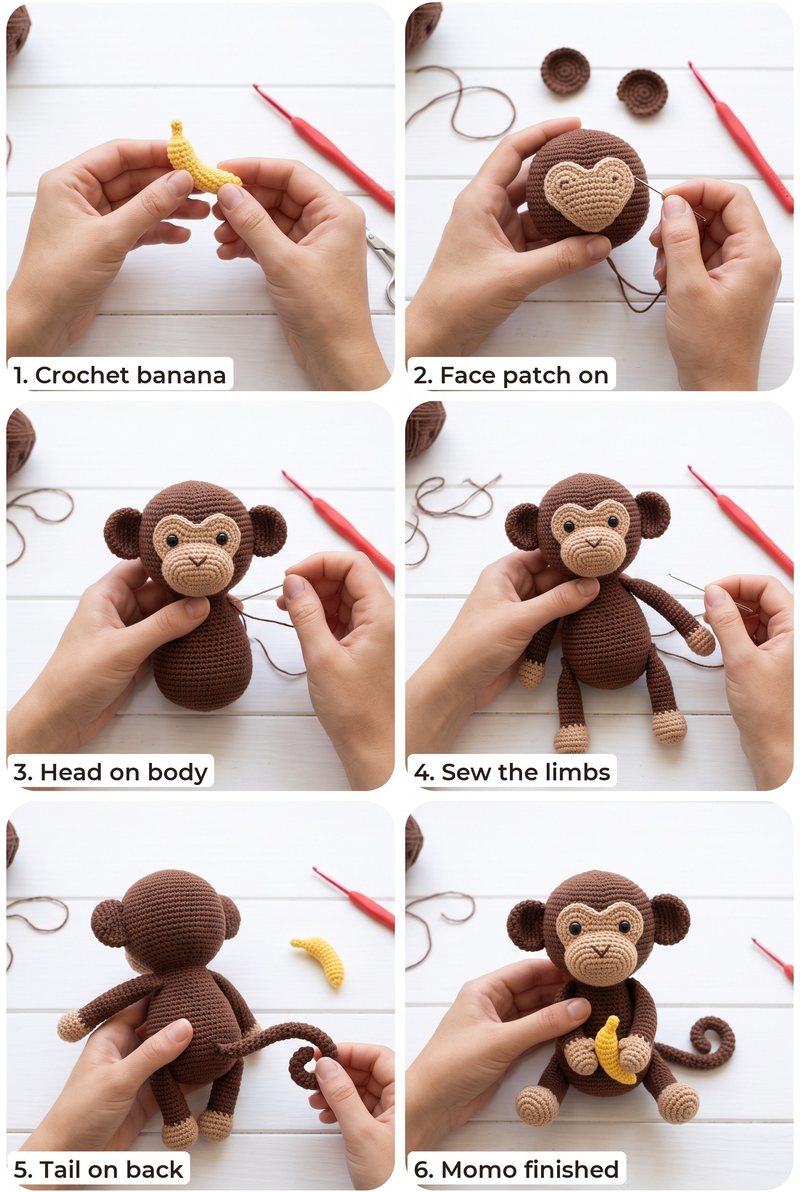
Finish with a small curved banana, then sew the pieces together and position it between Momo's hands.
Banana (yellow, make 1)
- R1: 6 sc in a magic ring (6)
- R2: inc ×6 (12)
- R3-5: sc around (12)
- R6: (1 sc, dec) ×4 (8)
- R7: (dec) ×4 (4)
- Stuff lightly, curve the little piece gently into a banana shape, then fasten off and close the opening.
- Sew the tan face patch to the lower front of the head, shaping its top edge into a heart. Add the embroidered smile.
- Sew the ears to either side of the head, level with the eyes.
- Sew the head securely to the top of the body, with the face looking forward.
- Sew the arms to the upper sides of the body and the legs low on the front, angled forward so Momo sits.
- Sew the curly tail to the lower back. Position the banana between the hands and stitch it in place.
Make a Grey Momo Version
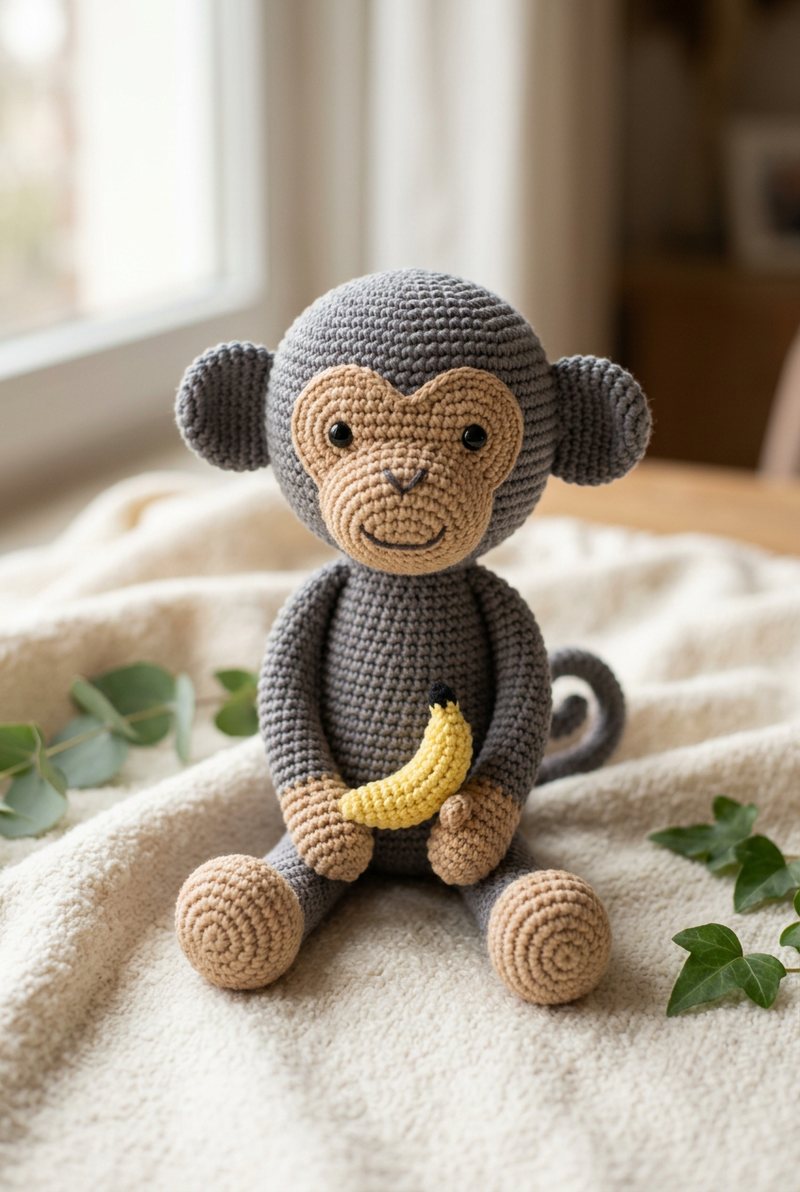
Use grey cotton instead of brown for the head, body, arms, legs, ears and tail; keep the tan face patch and hands, tan feet, and yellow banana.
FAQ
Can I embroider the eyes instead?
Yes. Embroidered eyes are a good choice for a toy for a baby or young child.
How do I make the face patch look heart-shaped?
Sew the flat circle onto the lower face and pinch its top edge slightly at the center. You can also embroider a heart outline.
Can I make Momo in another colour?
Yes. The variation uses grey for the monkey while keeping the tan details and yellow banana.
More Free Patterns You Will Love
Love these patterns? Get new ones in your Pinterest feed.
Follow us on Pinterest