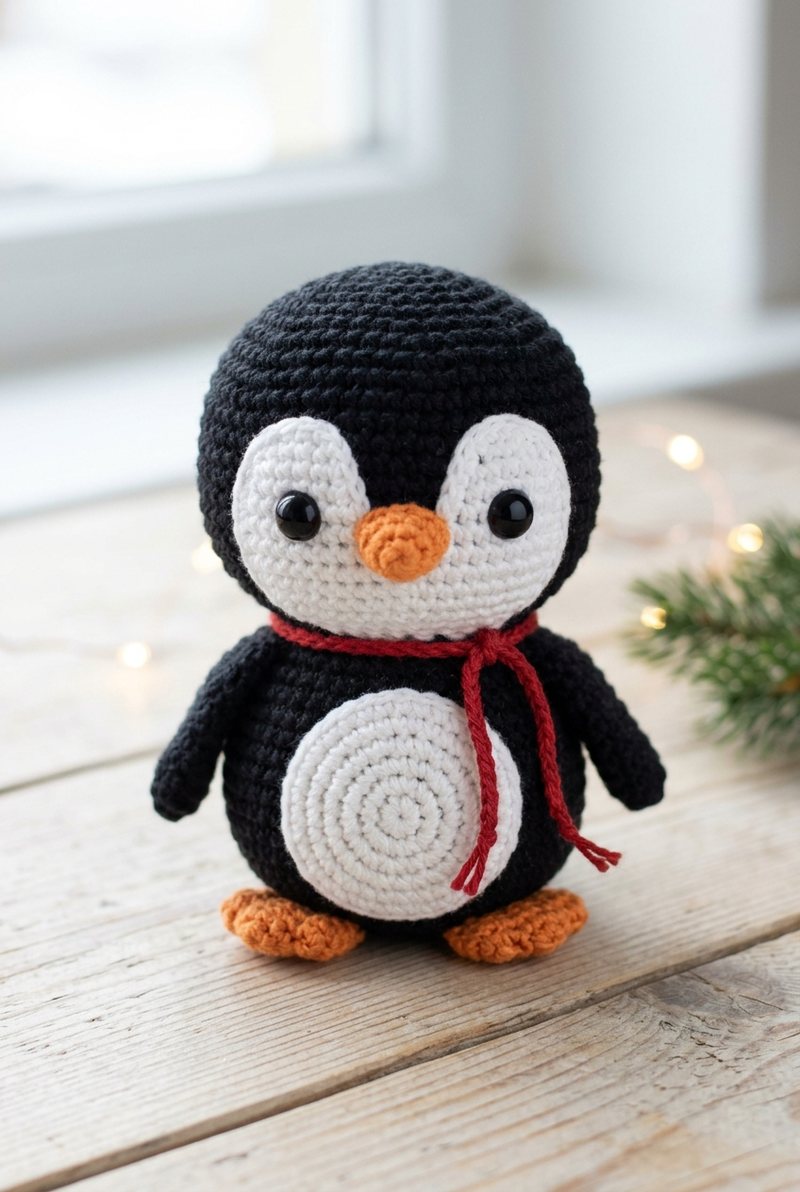
Pip is a round little penguin with a white face, a white tummy, an orange beak and orange feet, wrapped up in a red cord scarf. He is all simple round shapes, so he works up fast.
The face and tummy are flat circles sewn on, which makes the colour work easy. Follow the step-by-step photos for every part, and try the baby blue version at the end.
Looking for another animal? See all our crochet animal patterns in one place, sorted by farm, wild, ocean, pets and fantasy.
Pip the Penguin Free Crochet Pattern
What You’ll Need
- Sport / fine (size 2) cotton yarn in black, white, orange and red
- 2.5 mm crochet hook (a hook smaller than the yarn label suggests keeps the stitches tight)
- A pair of 10 mm safety eyes
- Fiberfill stuffing
- Tapestry needle, sewing pins and a stitch marker
The finished size depends on your yarn and hook: thicker yarn and a bigger hook make a bigger Pip.
Abbreviations (US terms)
- MR magic ring
- sc single crochet
- inc increase: 2 sc in the same stitch
- dec decrease (use the invisible decrease for a smooth finish)
- sl st slip stitch
- ch chain
- R round; the number in brackets is the stitch count at the end of the round
Before You Start
- Work in continuous rounds and move a stitch marker to the first stitch of each round.
- New to safety eyes? See how to attach safety eyes to amigurumi.
- Stuff as you go; this guide on stuffing amigurumi keeps the shapes smooth.
Head
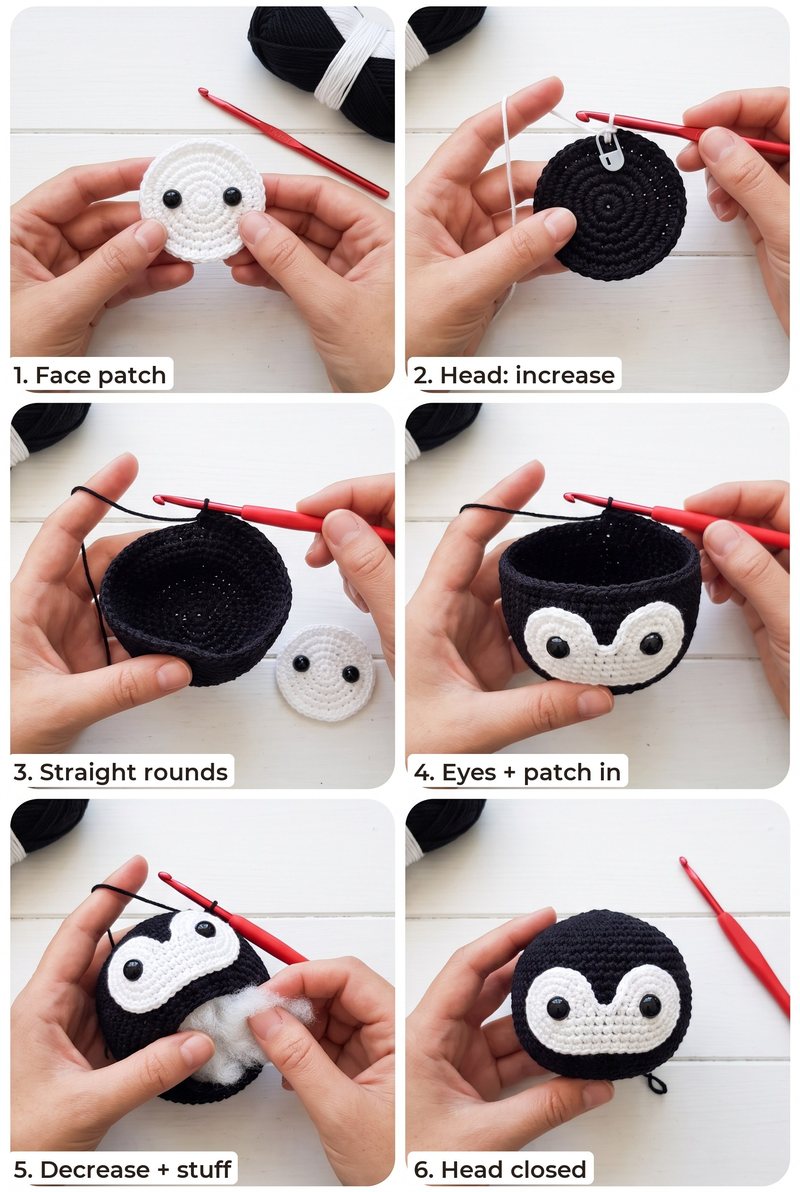
Face circles (white, make 2)
- R1: 6 sc in a magic ring (6)
- R2: inc ×6 (12)
- R3: (1 sc, inc) ×6 (18)
- Slip stitch to join and fasten off. Make these before the head: push one safety eye through the centre of each circle. Fix the eyes in the head with the two circles side by side, overlapping by 2-3 stitches, so they make a heart-shaped face. Sew the edges down.
Head (black, make 1)
- R1: 6 sc in a magic ring (6)
- R2: inc ×6 (12)
- R3: (1 sc, inc) ×6 (18)
- R4: (2 sc, inc) ×6 (24)
- R5: (3 sc, inc) ×6 (30)
- R6: (4 sc, inc) ×6 (36)
- R7: (5 sc, inc) ×6 (42)
- R8-15: sc around (42)
- Insert the 10 mm safety eyes, already pushed through the white face circles, between Rounds 11 and 13, about 8 stitches apart.
- R16: (5 sc, dec) ×6 (36)
- R17: (4 sc, dec) ×6 (30)
- R18: (3 sc, dec) ×6 (24)
- Stuff the head firmly and keep stuffing as you close.
- R19: (2 sc, dec) ×6 (18)
- R20: (1 sc, dec) ×6 (12)
- R21: dec ×6 (6)
- Fasten off, weave the tail through the front loops and pull the hole closed.
Face and Details
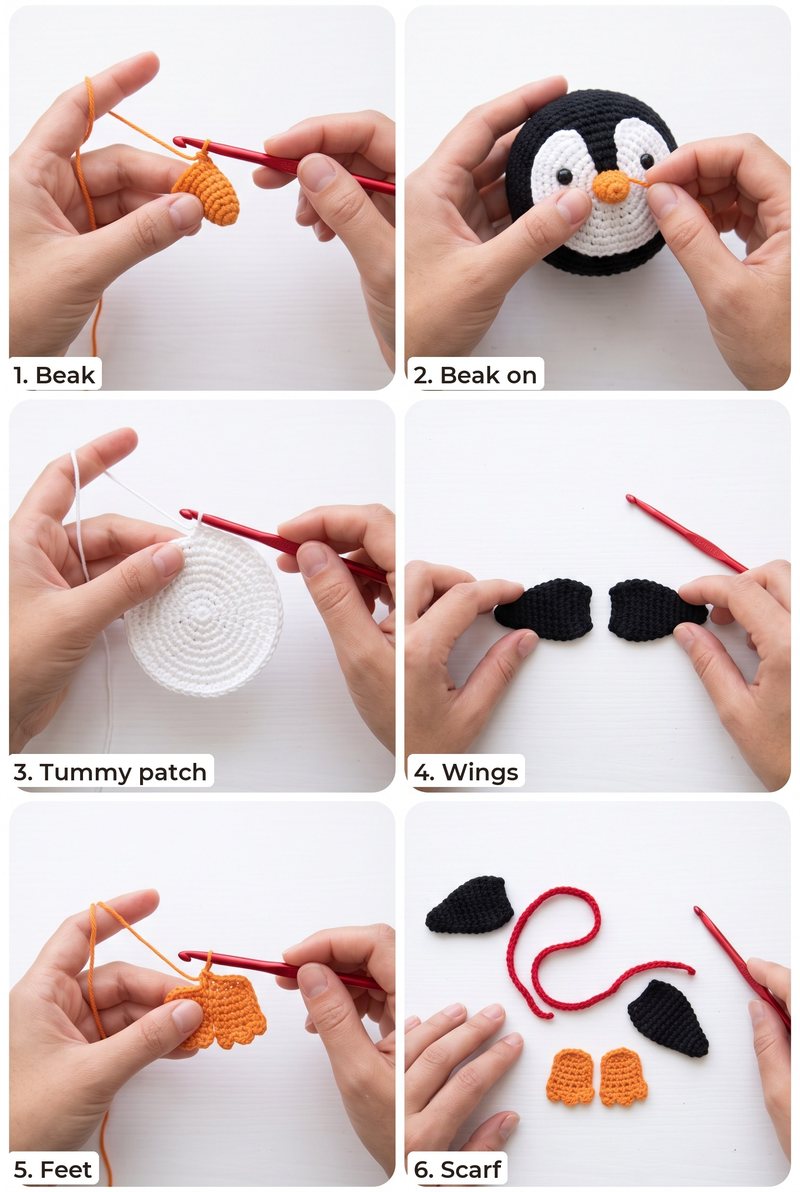
Beak (orange, make 1)
- R1: 4 sc in a magic ring (4)
- R2: (1 sc, inc) ×2 (6)
- R3: sc around (6)
- Stuff lightly and sew to the white face between the eyes.
Body and Limbs
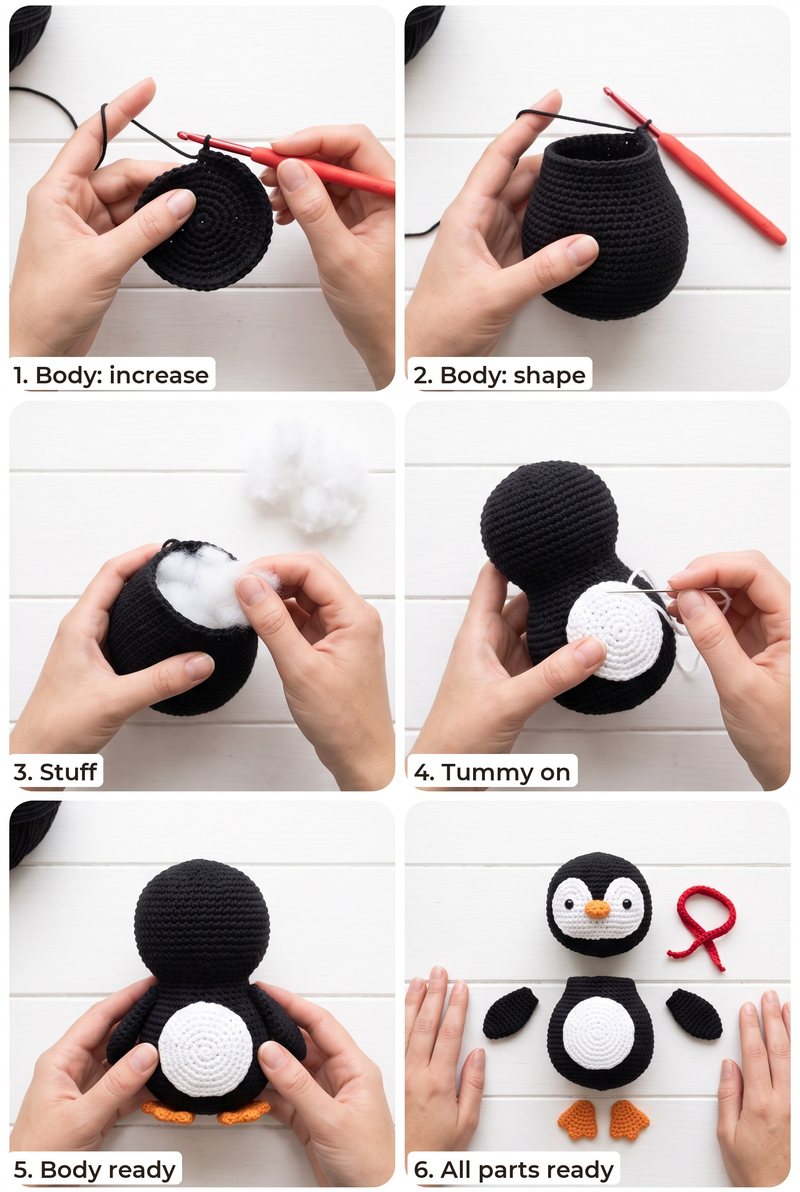
Body (black, make 1)
- R1: 6 sc in a magic ring (6)
- R2: inc ×6 (12)
- R3: (1 sc, inc) ×6 (18)
- R4: (2 sc, inc) ×6 (24)
- R5: (3 sc, inc) ×6 (30)
- R6-10: sc around (30)
- R11: (3 sc, dec) ×6 (24)
- R12-13: sc around (24)
- R14: (2 sc, dec) ×6 (18)
- R15: sc around (18)
- Stuff firmly. Fasten off, leaving a long tail to sew the body to the head.
Tummy (white, make 1)
- R1: 6 sc in a magic ring (6)
- R2: inc ×6 (12)
- R3: (1 sc, inc) ×6 (18)
- R4: (2 sc, inc) ×6 (24)
- Slip stitch to join and fasten off. Sew to the front of the body.
Wings (black, make 2)
- R1: 6 sc in a magic ring (6)
- R2: (2 sc, inc) ×2 (8)
- R3-9: sc around (8)
- Stuff only the bottom half. Flatten the top.
- Close: 4 sc through both layers (4)
- Fasten off and sew to the sides of the body just below the neck.
Feet (orange, make 2)
- R1: 6 sc in a magic ring (6)
- R2: inc ×6 (12)
- R3: sc around (12)
- Do not stuff. Flatten.
- Close: 6 sc through both layers (6)
- Fasten off. Optional: stitch two short lines across the front edge with orange yarn to shape three toes. Sew under the front of the body.
Scarf (red, make 1)
- Ch 46. Row 1: sl st in the 2nd ch from the hook and in each ch across (45)
- Fasten off. Wrap the cord around the neck and tie a loose knot at the side, letting the ends hang.
Assembly
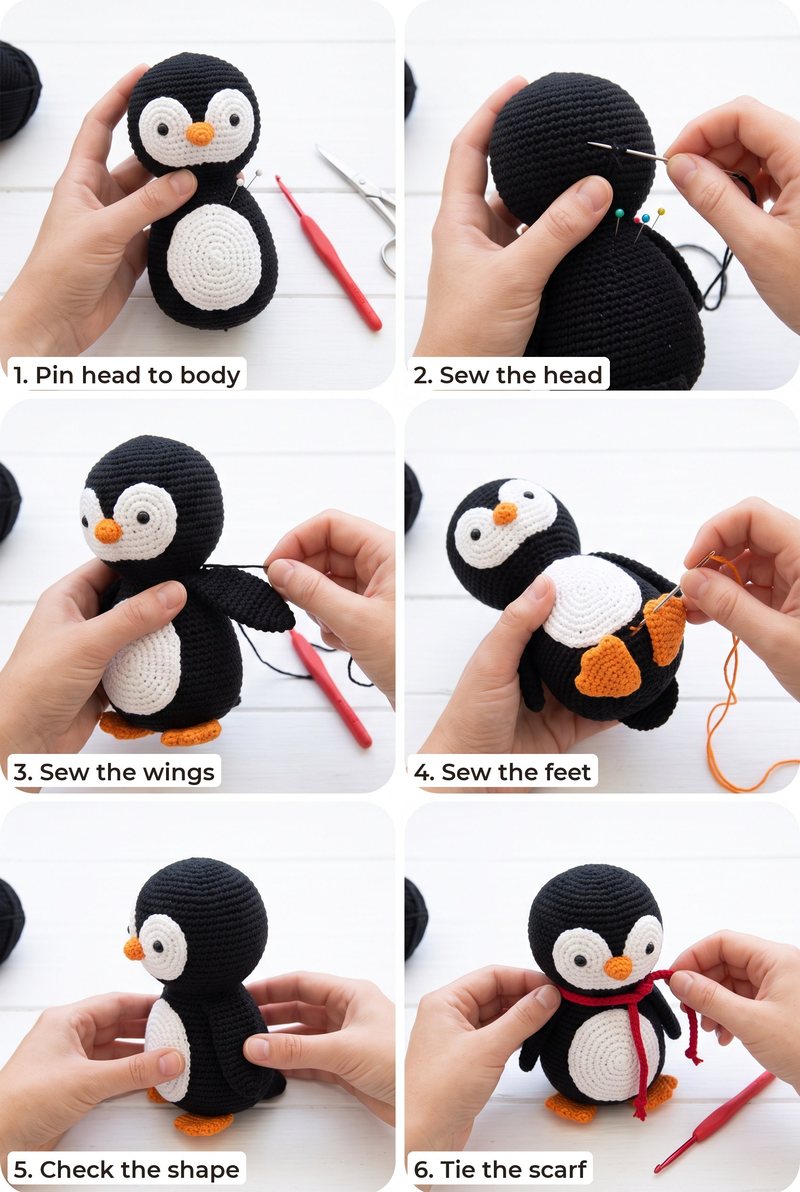
- Sew the white tummy to the front of the body.
- Sew the head to the body, with the white face facing forward.
- Sew the beak to the face between the eyes.
- Sew a wing on each side of the body, just below the neck.
- Sew the feet under the front of the body so they peek out, then tie the red scarf around the neck.
For invisible seams, follow how to sew amigurumi pieces together, and for the nose see how to embroider faces on amigurumi.
Make a Baby blue penguin
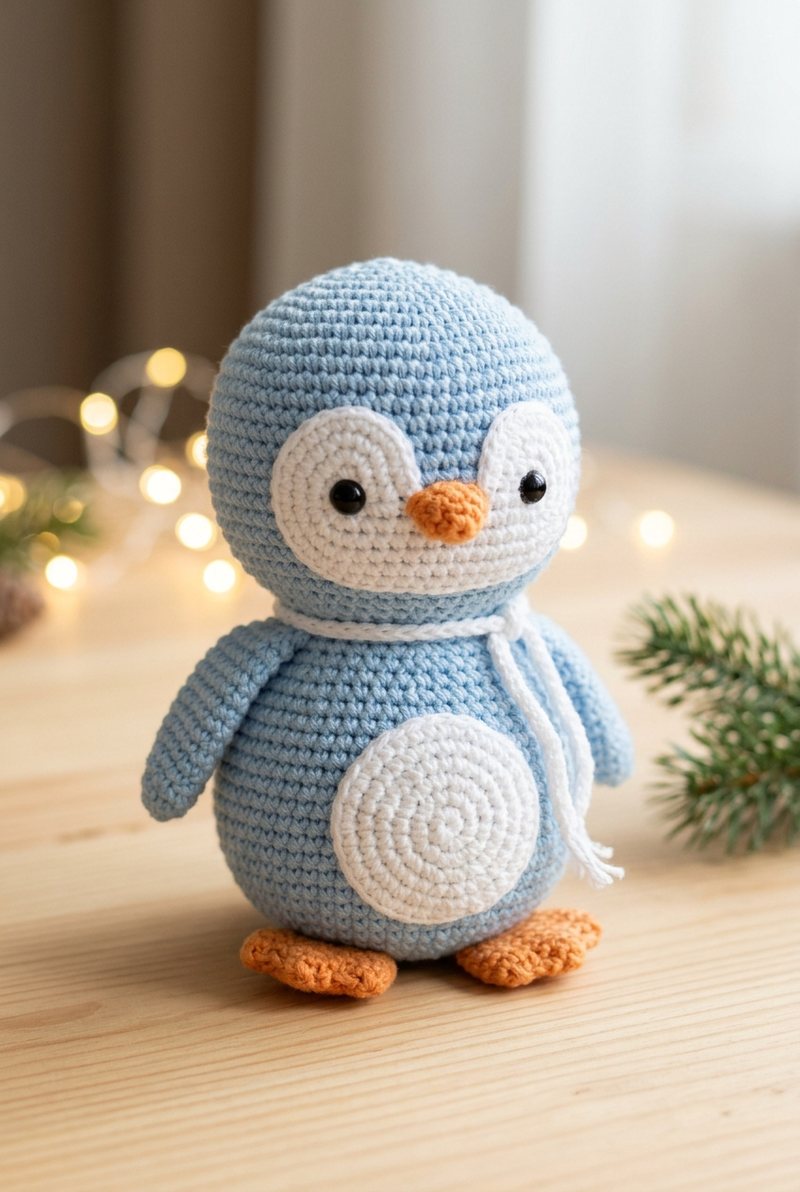
Swap black for baby blue and red for white in the scarf. Keep the face, tummy, beak and feet the same.
FAQ
Why is the face a separate patch?
Sewing a flat white circle on is much easier than changing colours in the round, and it keeps the white edge clean.
Can Pip stand up?
He sits on his round bottom. Stuff the base firmly and flatten it a little with your hand so he stays upright.
Is it safe for babies?
Safety eyes can come loose with hard play. For a baby, embroider the eyes with black yarn instead.
More Free Patterns You Will Love
Love these patterns? Get new ones in your Pinterest feed.
Follow us on Pinterest