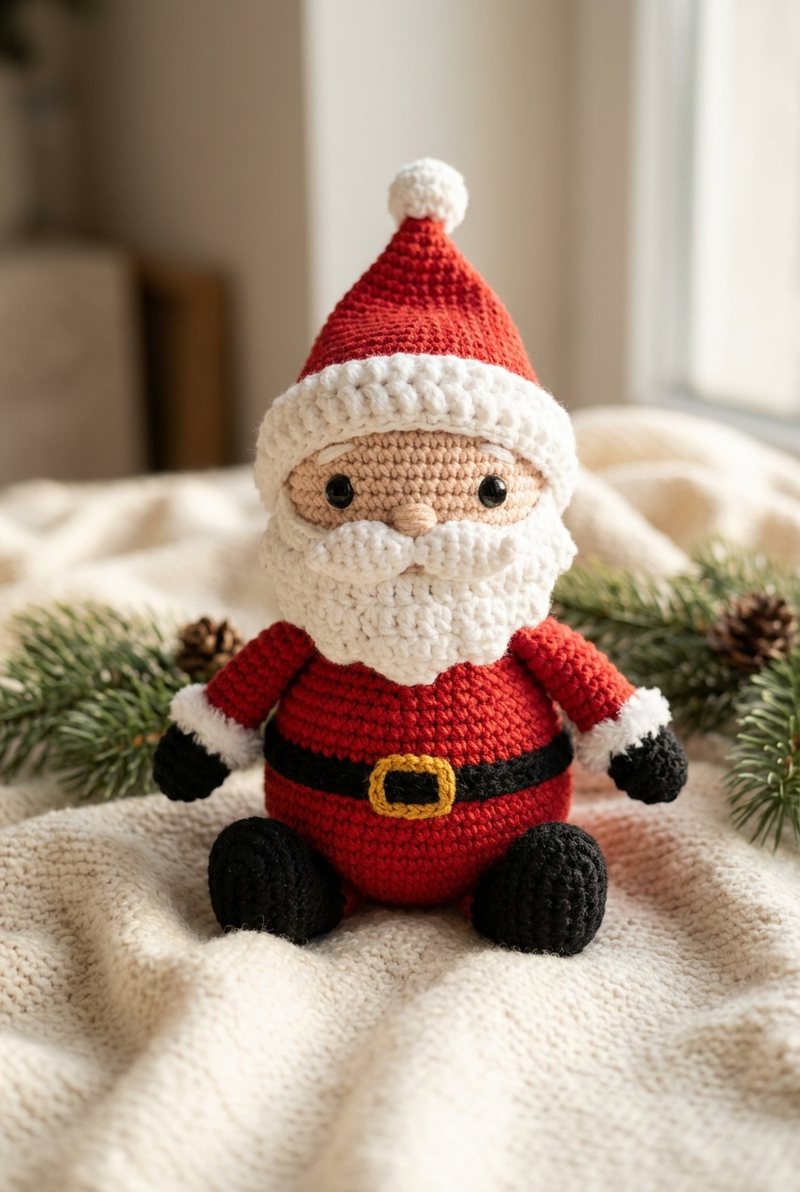
Crochet a chubby Santa with a round red body, black belt and little gold buckle. His skin-tone head has small eyes and a soft white beard, topped with a pointed red hat and pompom.
Short booted legs and mitten arms help him sit, while a white mustache adds a finishing touch. The pattern is worked in spiral rounds with sport cotton and a 2.5 mm hook; a green-coat variation is included.
Chubby Santa Free Crochet Pattern
What You’ll Need
- Sport / fine (size 2) cotton yarn: sport cotton in red, skin tone, white, black and gold
- 2.5 mm crochet hook (a hook smaller than the yarn label suggests keeps the stitches tight)
- 8 to 10 mm safety eyes (or black yarn to embroider them)
- Fiberfill stuffing
- Tapestry needle, sewing pins and a stitch marker
The finished size depends on your yarn and hook: thicker yarn and a bigger hook make a bigger piece.
Abbreviations (US terms)
- MR magic ring
- sc single crochet
- inc increase: 2 sc in the same stitch
- dec decrease (an invisible decrease gives the smoothest finish)
- ch chain
- sl st slip stitch
- R round; Row row worked flat; the number in brackets is the stitch count at the end
Boots and Body
Make the small booted legs and round body first. The black belt is worked in color-change rounds, and the gold buckle is sewn on afterward.
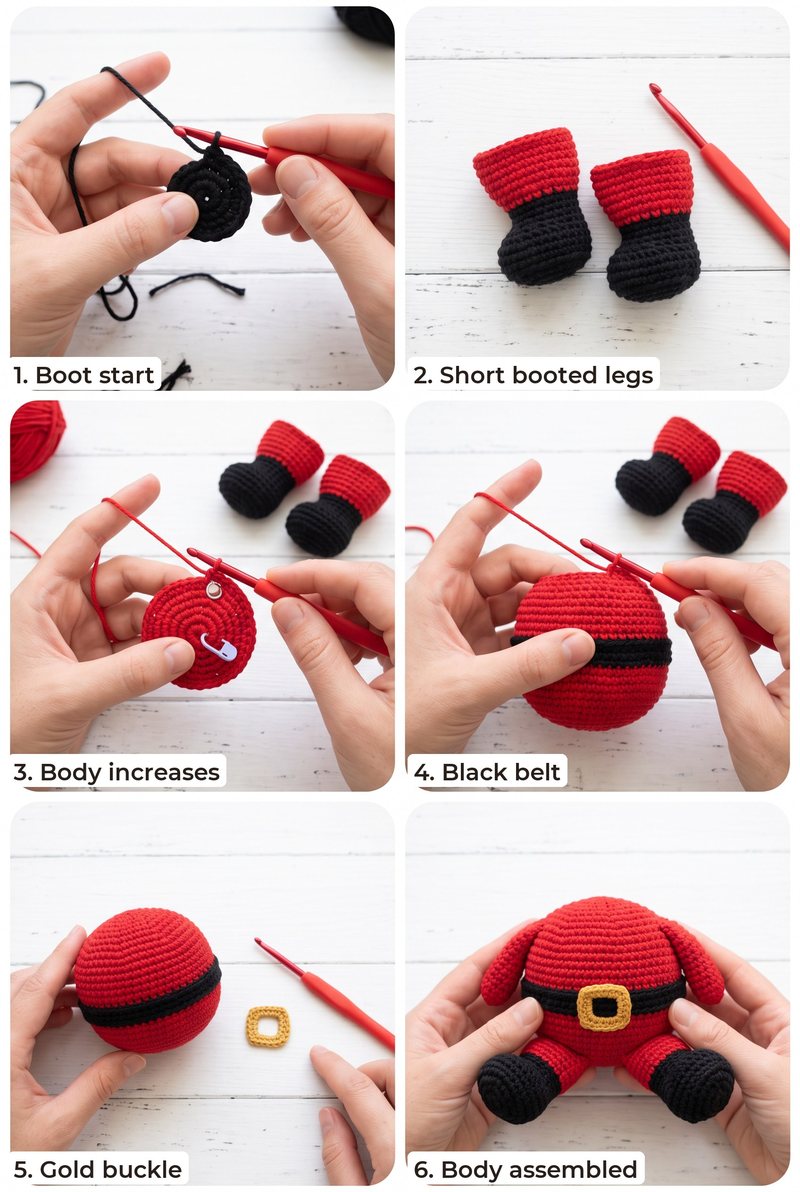
Boots and legs (black, then red, make 2)
- R1: 6 sc in a magic ring (6)
- R2: inc ×6 (12)
- R3-4: sc around (12)
- Change to red.
- R5-6: sc around (12)
- Stuff the boot and leg lightly as you go.
- Close: 6 sc through both layers (6)
- Fasten off, leaving a long tail to sew each short leg to the lower front of the body.
Body (red, with a black belt, make 1)
- R1: 6 sc in a magic ring (6)
- R2: inc ×6 (12)
- R3: (1 sc, inc) ×6 (18)
- R4: (2 sc, inc) ×6 (24)
- R5: (3 sc, inc) ×6 (30)
- R6: (4 sc, inc) ×6 (36)
- R7: (5 sc, inc) ×6 (42)
- R8: (6 sc, inc) ×6 (48)
- R9-11: sc around (48)
- Change to black for the belt.
- R12-13: sc around (48)
- Change to red.
- R14-16: sc around (48)
- R17: (6 sc, dec) ×6 (42)
- R18: (5 sc, dec) ×6 (36)
- R19: (4 sc, dec) ×6 (30)
- R20: (3 sc, dec) ×6 (24)
- Stuff the body firmly and keep stuffing as you close. Fasten off, leaving a long tail to sew on the head.
Buckle (gold, make 1)
- R1: 6 sc in a magic ring (6)
- Fasten off, leaving a tail. Sew the small gold circle to the center front of the black belt.
Head and Beard
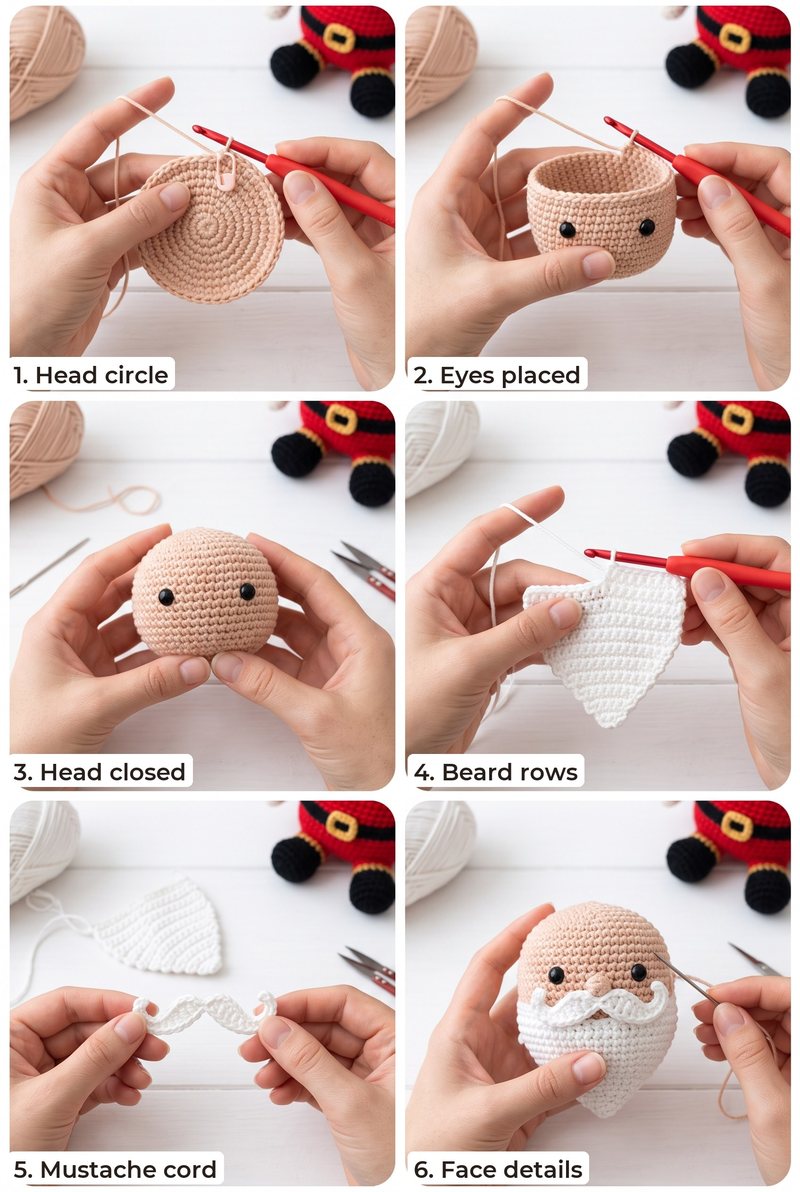
Head (skin tone, make 1)
- R1: 6 sc in a magic ring (6)
- R2: inc ×6 (12)
- R3: (1 sc, inc) ×6 (18)
- R4: (2 sc, inc) ×6 (24)
- R5: (3 sc, inc) ×6 (30)
- R6: (4 sc, inc) ×6 (36)
- R7: (5 sc, inc) ×6 (42)
- R8: (6 sc, inc) ×6 (48)
- R9-16: sc around (48)
- Insert two small safety eyes on the front, several stitches apart. For a baby-safe toy, embroider the eyes instead.
- R17: (6 sc, dec) ×6 (42)
- R18: (5 sc, dec) ×6 (36)
- R19: (4 sc, dec) ×6 (30)
- R20: (3 sc, dec) ×6 (24)
- Stuff the head firmly and keep stuffing as you close.
- R21: (2 sc, dec) ×6 (18)
- R22: (1 sc, dec) ×6 (12)
- R23: dec ×6 (6)
- Fasten off and pull the hole closed.
Beard (white, make 1)
- Row 1: ch 25, sc in the 2nd ch from the hook and in each ch across (24)
- Turn at the end of each row and ch 1; the turning chain does not count as a stitch.
- Row 2: sc across (24)
- Row 3: (2 sc, dec) ×6 (18)
- Row 4: (1 sc, dec) ×6 (12)
- Row 5: (dec) ×6 (6)
- Fasten off, leaving a long tail. Sew the wide edge beneath the eyes, shaping the narrower end into a point.
Mustache (white, make 1)
- Ch 24. Row 1: sl st in the 2nd ch from the hook and in each ch across (23)
- Fasten off, curve the cord into two curls and sew it across the upper edge of the beard.
Arms, Hat and Assembly
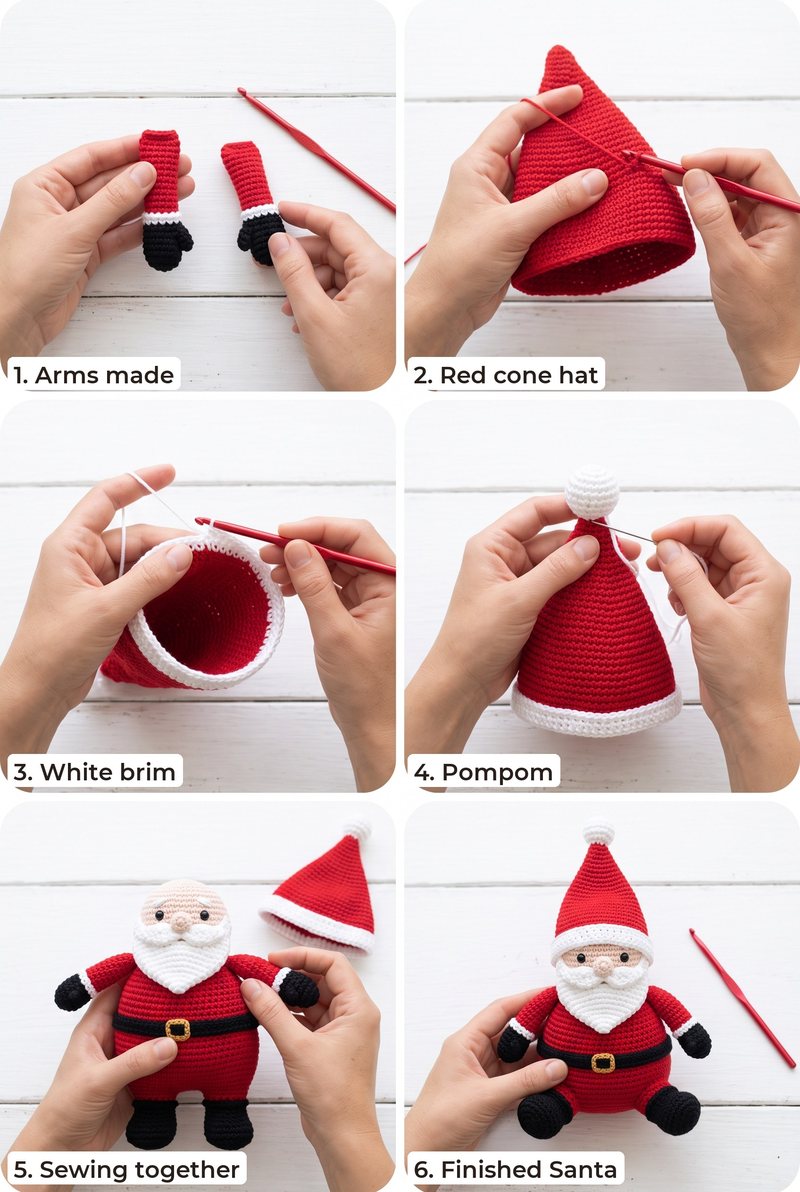
Arms (black, white, then red, make 2)
- R1: 6 sc in a magic ring (6)
- R2: inc ×6 (12)
- R3: sc around (12)
- Stuff the mitten lightly.
- R4: dec ×6 (6)
- Change to white for the cuff.
- R5-6: sc around (6)
- Change to red for the arm.
- R7-11: sc around (6)
- Flatten the top of the arm.
- Close: 3 sc through both layers (3)
- Fasten off, leaving a tail to sew the arm to the side of the body.
Hat (red, with a white brim, make 1)
- R1: 6 sc in a magic ring (6)
- R2: inc ×6 (12)
- R3: (1 sc, inc) ×6 (18)
- R4: (2 sc, inc) ×6 (24)
- R5: (3 sc, inc) ×6 (30)
- R6: (4 sc, inc) ×6 (36)
- R7: (5 sc, inc) ×6 (42)
- R8: (6 sc, inc) ×6 (48)
- R9: sc around (48)
- Change to white for the brim.
- R10-11: sc around (48)
- Fasten off, leaving a tail to sew the hat to the head. The brim has 48 stitches, matching the head's widest round.
Pompom (white, make 1)
- R1: 6 sc in a magic ring (6)
- R2: inc ×6 (12)
- R3: sc around (12)
- Stuff lightly.
- R4: dec ×6 (6)
- Fasten off, leaving a tail to sew the pompom to the hat tip.
- Sew the short booted legs to the lower front of the body so Santa can sit. Sew the gold buckle to the center of the black belt.
- Sew the beard beneath the eyes, then curve and stitch the white mustache across its upper edge.
- Sew the head to the top of the body with the face pointing forward.
- Sew the arms to the sides of the body, just below the head.
- Fit the hat over the head with the white brim at the forehead, sew it in place, and attach the pompom to the tip.
Make a Green-coat Father Christmas Version
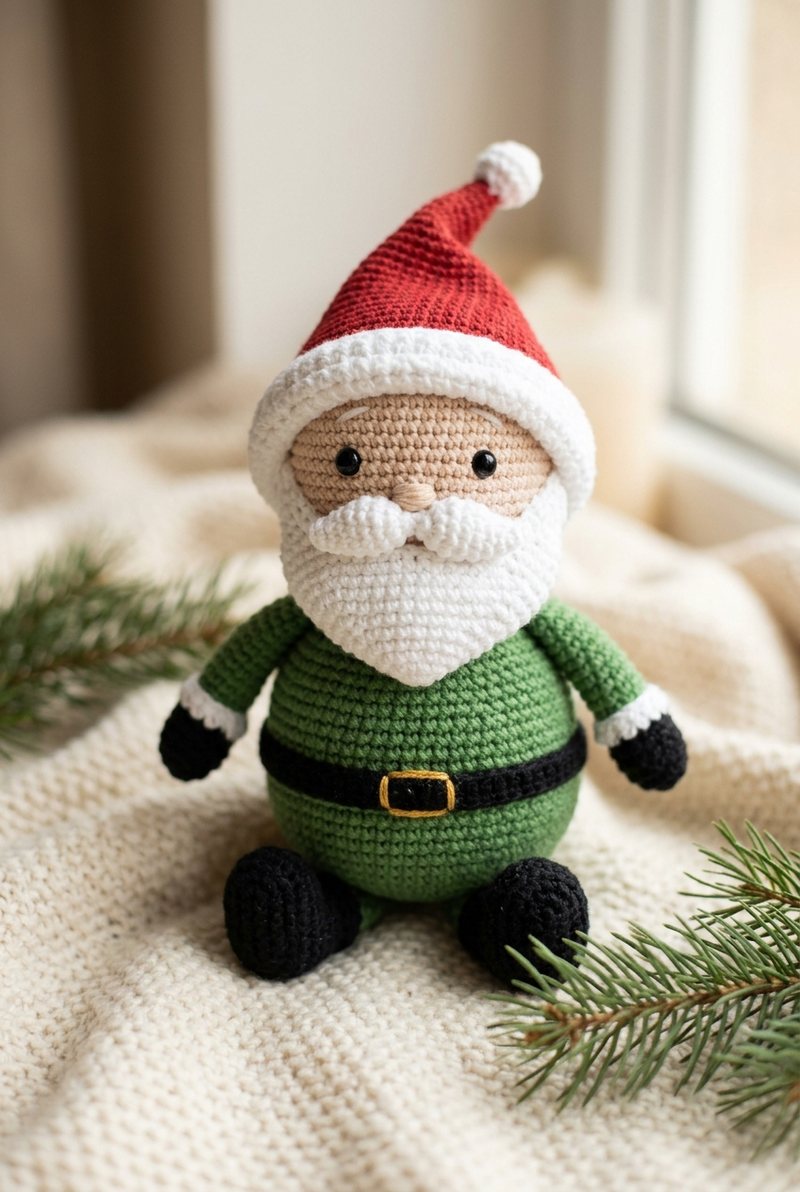
Use green instead of red for the body and arms to make a green-coat Father Christmas; keep the black belt, white beard, red hat and black boots.
FAQ
Can I embroider the eyes?
Yes. Embroidered eyes are a good alternative to safety eyes, especially for a toy intended for a young child.
Can I make the beard longer?
You can begin with a wider foundation row and work additional decrease rows to shape a longer beard.
Can I change the coat color?
Yes. Work the body and arms in green for a Father Christmas look, while keeping the belt and other details as written.
More Free Patterns You Will Love
Love these patterns? Get new ones in your Pinterest feed.
Follow us on Pinterest