Flurry is a chubby snowman with a big white body, a smaller round head, a little orange carrot nose and three black coal buttons. A black top hat with a red band and a red-and-white striped scarf finish the look.
Make each piece with sport cotton and a 2.5 mm hook, working in spiral single crochet rounds unless a part is worked flat. The step-by-step photos show how to make Flurry and put him together.
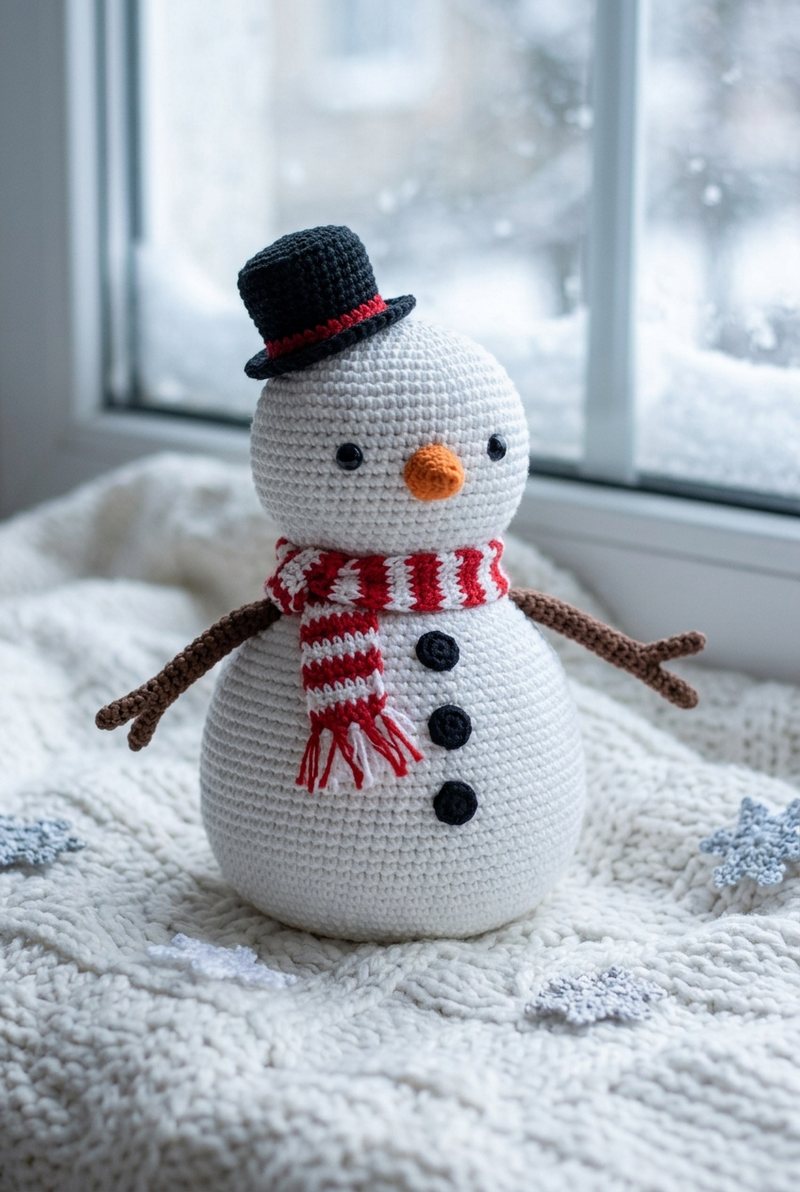
Flurry the Snowman Free Crochet Pattern
What You’ll Need
- Sport / fine (size 2) cotton yarn: white, black, orange, red and brown sport cotton, plus a little white for the scarf stripes
- 2.5 mm crochet hook (a hook smaller than the yarn label suggests keeps the stitches tight)
- 8 to 10 mm safety eyes (or black yarn to embroider them)
- Fiberfill stuffing
- Tapestry needle, sewing pins and a stitch marker
The finished size depends on your yarn and hook: thicker yarn and a bigger hook make a bigger piece.
Abbreviations (US terms)
- MR magic ring
- sc single crochet
- inc increase: 2 sc in the same stitch
- dec decrease (an invisible decrease gives the smoothest finish)
- ch chain
- sl st slip stitch
- R round; Row row worked flat; the number in brackets is the stitch count at the end
Body
Work the large white body as a stuffed ball, increasing to 48 stitches before shaping it back down.
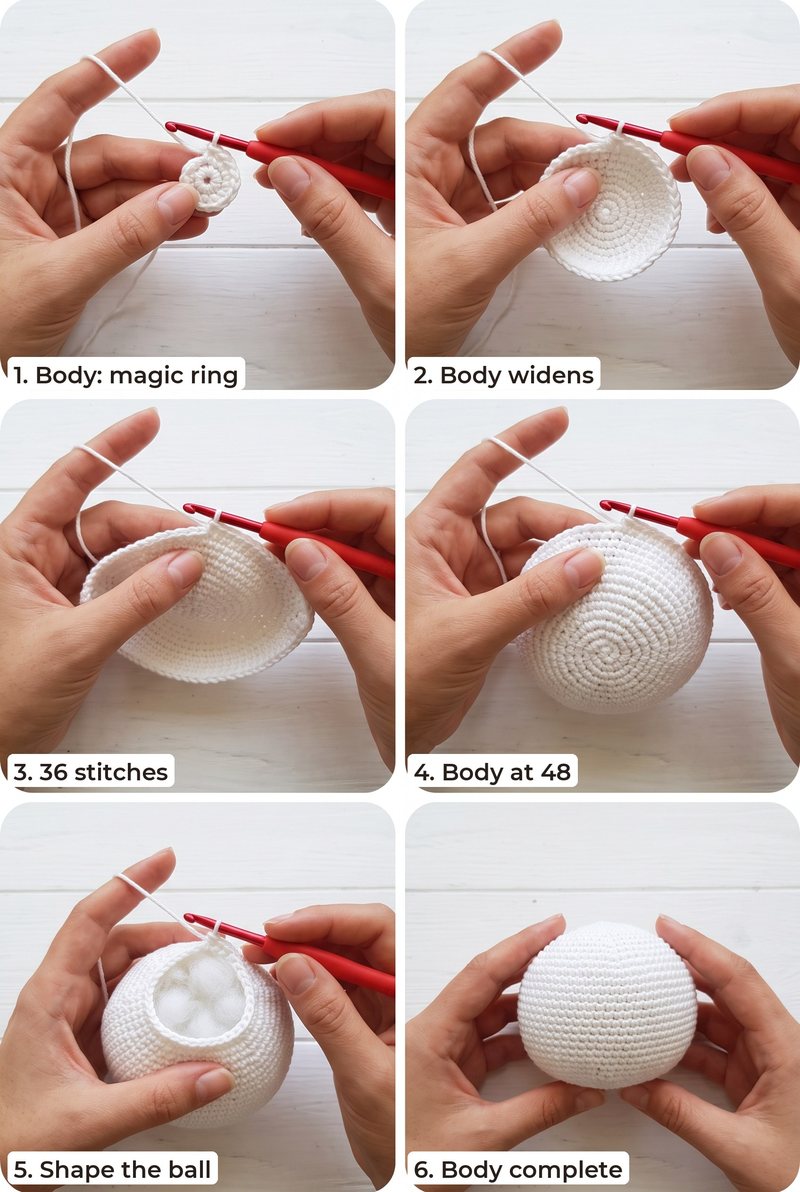
Body (white, make 1)
- R1: 6 sc in a magic ring (6)
- R2: inc ×6 (12)
- R3: (1 sc, inc) ×6 (18)
- R4: (2 sc, inc) ×6 (24)
- R5: (3 sc, inc) ×6 (30)
- R6: (4 sc, inc) ×6 (36)
- R7: (5 sc, inc) ×6 (42)
- R8: (6 sc, inc) ×6 (48)
- R9-13: sc around (48)
- Stuff the body firmly and keep stuffing as you decrease.
- R14: (6 sc, dec) ×6 (42)
- R15: (5 sc, dec) ×6 (36)
- R16: (4 sc, dec) ×6 (30)
- R17: (3 sc, dec) ×6 (24)
- R18: (2 sc, dec) ×6 (18)
- R19: (1 sc, dec) ×6 (12)
- R20: dec ×6 (6)
- Fasten off and pull the opening closed. Leave a long tail to sew on the head.
Head and Carrot Nose
The smaller head is a white ball worked to 36 stitches. Add the eyes while it is open, then sew on the carrot nose.
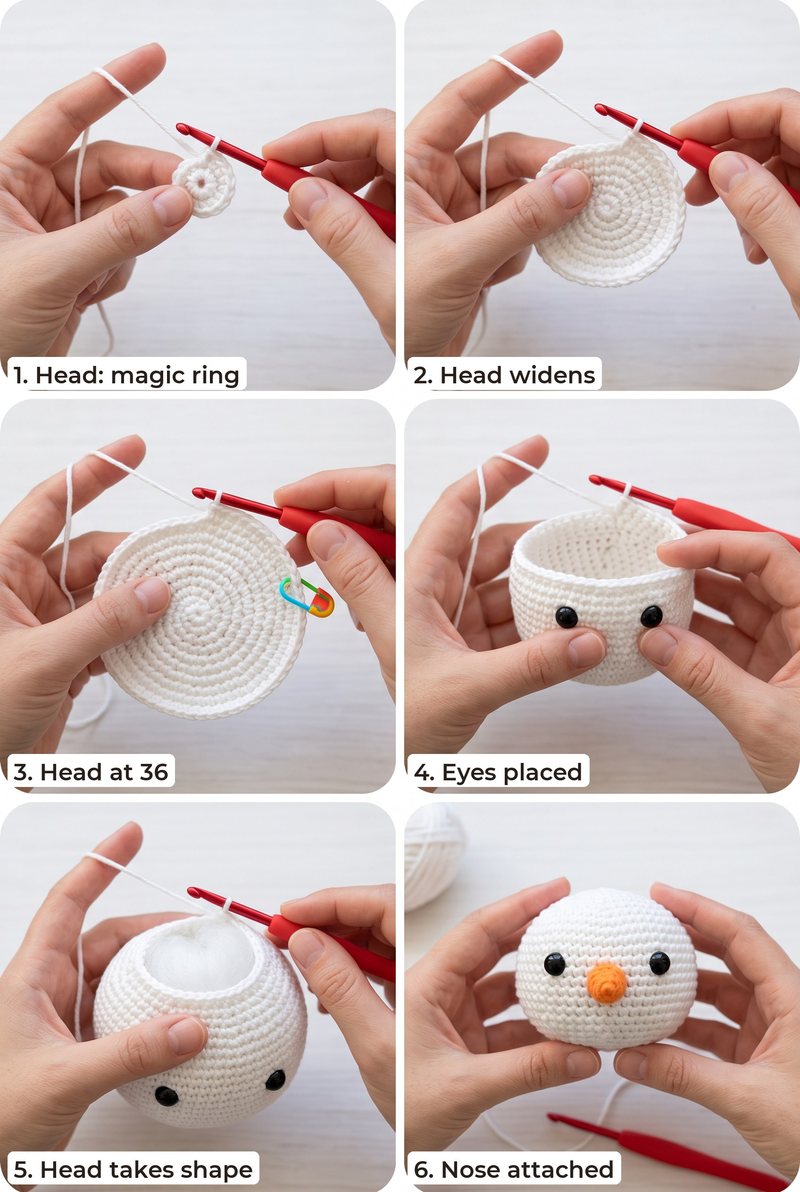
Head (white, make 1)
- R1: 6 sc in a magic ring (6)
- R2: inc ×6 (12)
- R3: (1 sc, inc) ×6 (18)
- R4: (2 sc, inc) ×6 (24)
- R5: (3 sc, inc) ×6 (30)
- R6: (4 sc, inc) ×6 (36)
- R7-9: sc around (36)
- Insert two safety eyes between Rounds 10 and 11, about 7 stitches apart, or embroider them later.
- R10-11: sc around (36)
- Stuff the head firmly and keep stuffing as you decrease.
- R12: (4 sc, dec) ×6 (30)
- R13: (3 sc, dec) ×6 (24)
- R14: (2 sc, dec) ×6 (18)
- R15: (1 sc, dec) ×6 (12)
- R16: dec ×6 (6)
- Fasten off and pull the opening closed. Leave a long tail to sew the head to the body.
Carrot nose (orange, make 1)
- R1: 4 sc in a magic ring (4)
- R2: (1 sc, inc) ×2 (6)
- R3: (2 sc, inc) ×2 (8)
- R4-5: sc around (8)
- Fasten off, leaving a tail. Add a little stuffing if needed and sew the wide end between the eyes.
Hat, Scarf and Details
Make the hat pieces and simple accessories, then sew them to the body and head to finish Flurry.
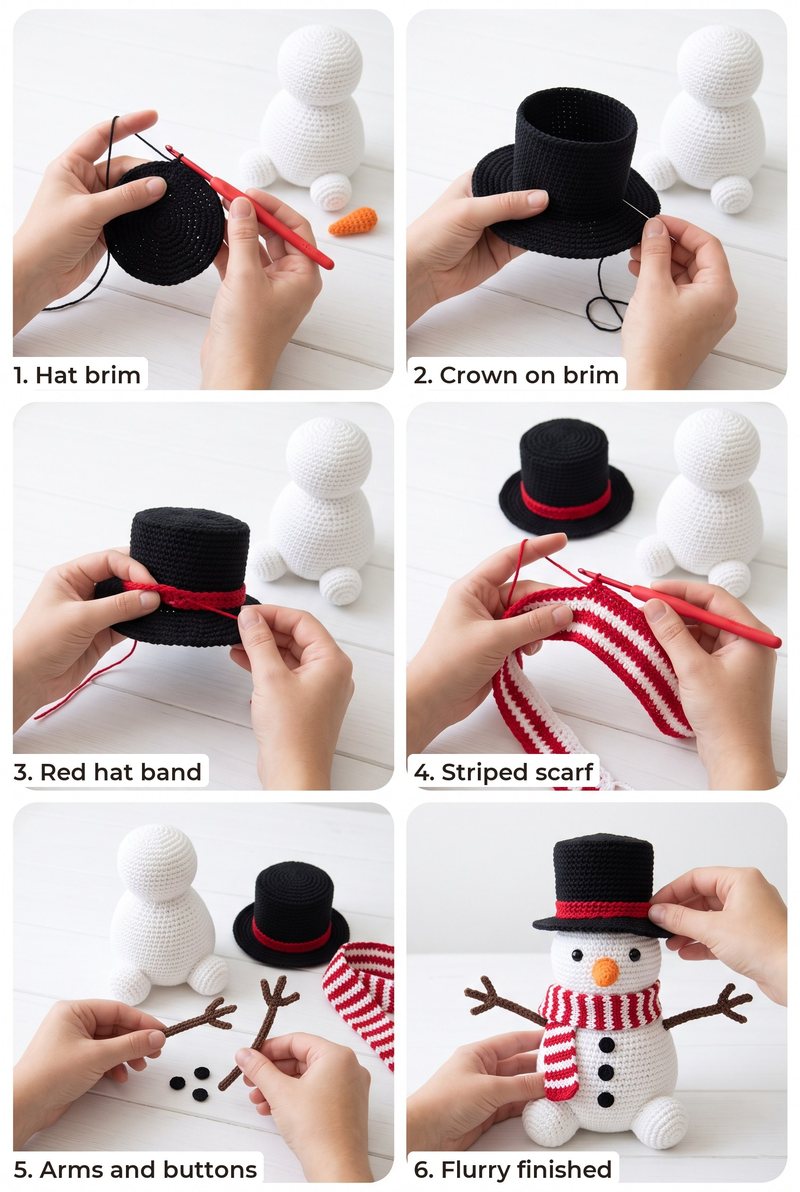
Hat brim (black, make 1)
- R1: 6 sc in a magic ring (6)
- R2: inc ×6 (12)
- R3: (1 sc, inc) ×6 (18)
- R4: (2 sc, inc) ×6 (24)
- R5: (3 sc, inc) ×6 (30)
- R6: (4 sc, inc) ×6 (36)
- R7: (5 sc, inc) ×6 (42)
- R8: sc around (42)
- Fasten off, leaving a tail to sew the crown to the center of the brim.
Hat crown (black, make 1)
- R1: 6 sc in a magic ring (6)
- R2: inc ×6 (12)
- R3: (1 sc, inc) ×6 (18)
- R4: (2 sc, inc) ×6 (24)
- R5-8: sc around (24)
- Fasten off, leaving the bottom open. Sew the open edge to the center of the brim.
Hat band (red, make 1)
- Row 1: ch 25, sc in the 2nd ch from the hook and in each ch across (24)
- Row 2-3: sc across (24)
- Fasten off. Wrap the strip around the lower crown, sew the short ends together, then sew the band in place.
Striped scarf (red and white, make 1)
- Row 1: ch 49, sc in the 2nd ch from the hook and in each ch across (48)
- Row 2-3: sc across (48)
- Change to white.
- Row 4: sc across (48)
- Change to red.
- Row 5-6: sc across (48)
- Change to white.
- Row 7: sc across (48)
- Fasten off. The rows make a long striped strip; wrap it loosely around Flurry's neck.
Twig arms (brown, make 2)
- Ch 12. Row 1: sl st in the 2nd ch from the hook and in each ch across (11)
- Fasten off, leaving a long tail. Sew one cord to each side of the body, near the join with the head.
Coal buttons (black, make 3)
- R1: 6 sc in a magic ring (6)
- Slip stitch to join and fasten off, leaving a tail to sew each circle to the front of the body.
- Sew the head securely to the top of the body, centering it.
- Sew the carrot nose between the eyes, with its pointed end facing outward.
- Sew the black crown to the center of the brim, then place the hat on the head and sew it in place.
- Sew the twig arms to the sides of the body and arrange the three coal buttons in a line down the front.
- Wrap the striped scarf around the neck and tack it in place with a few stitches.
For more face ideas, see how to embroider faces on amigurumi.
Make a Green scarf and red hat Version
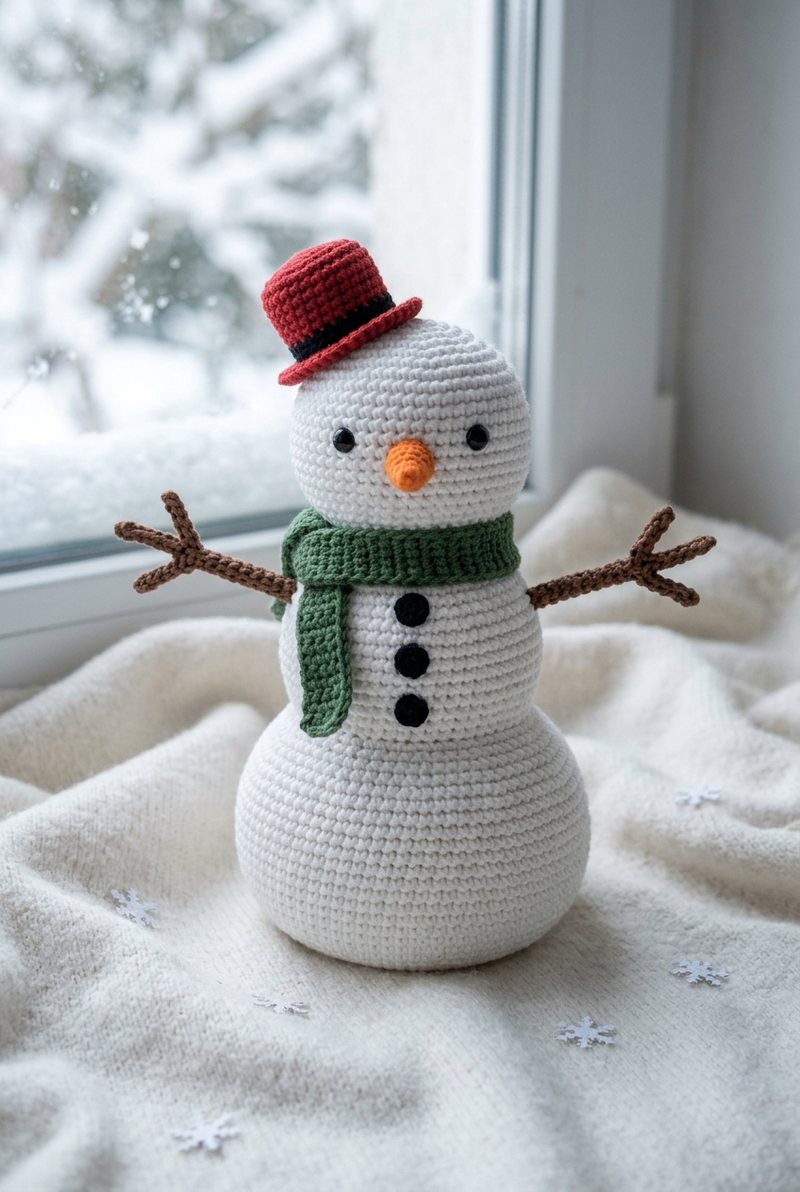
Make the scarf green and the top hat red, keeping the same white snowman, orange nose, brown arms and black buttons.
FAQ
Can I embroider the eyes instead?
Yes. Embroider small black eyes with yarn before closing the head, and avoid safety eyes if the toy is for a young child.
Can I change the scarf colours?
Yes. Keep the same rows and change the yarn colours to make any stripe combination you like.
How should I attach the hat?
Center the crown and brim on the head, then sew the brim down with several small stitches so the hat stays in place.
More Free Patterns You Will Love
Love these patterns? Get new ones in your Pinterest feed.
Follow us on Pinterest